For my final look I decided that instead of applying a thick layer of fullers earth, I would only apply a thin layer because the thick layer took over an hour to dry and I think the thinner layer looked more crusty which I preferred.
Step by Step:
1. I first applied white super colour in a thin layer all round my eyes to get a smooth, even coverage.
2. I then applied white super colour to the eyelashes and eyebrows using a disposable mascara wand, and making sure to brush te eyebrow hairs backwards.
3. I applied translucent powder all over the super colour with a powder puff.
4. I then applied the fullers earth, in a thin layer, all over the face but avoiding round the eyes.

Wet fullers earth
 |
| Dry fullers earth |
5. I waited for the fullers earth to fully dry and I then applied some white super colour all over the fullers earth, making sure that it is even and that the edges are blended. I used a foundation brush for this.

6. I then powdered over the top of the fullers earth with talcum powder to give it a very powdery look.
7. I then added the lighter pink shadow on the upper nose and into the brow, under the cheekbone and on te lips, using a flat eyeshadow brush.
8. I next added the darker pink shadow on top of these areas where I want more definition e.g. The centre of the lips.

I wasn't completely happy with this makeup look as I felt it didn't have enough colour; however when I added the extra bit of pink on the side of the forehead I think it brought the whole look together and also gave the face more dimension.
In my final look I wanted it to show the contrast between what the Queen Elizabeth I portrayed her makeup to look like through her portraits and also how their makeup would actually look like in person. The rough, flakey, textured looking skin round the face represents the toxic mixture of white lead and vinegar that the Elizabeth women would have used on the face. Then the smooth, even, soft looking skin around the eyes and nose represents what Queen Elizabeth I wanted people to think her skin looked like. I really like the contrast between the two textures and think it adds a unique and contemporary twist to my makeup look. I used a rosy pink colour for the contour as that is the colour that the Elizabethan women subtly wore on their cheeks and lips; however I modified the placement of this colour to give the look a strong, contoured look, which is more popular in today's society.
I think in my final look I will not take the pink colour above the eyebrow and I will just keep it underneath and in the eyebrow hairs. I may also experiment with not making the makeup around the upper nose so sharp as I think it is to much of a contrast against the softer lips and colour on the forehead. I think I may add more red to make the pink colour look more rosy, which would be more like the colour that the Elizabethan women wore on their cheeks and lips. I really like the contrast between the very smooth skin and the bushy, textured eyebrows. In my final look I will try to make the eyebrows even more white so that the colour blends in more with the skin. I am really excited to experiment with these points and apply the makeup look to the whole face.
6. I then powdered over the top of the fullers earth with talcum powder to give it a very powdery look.
7. I then added the lighter pink shadow on the upper nose and into the brow, under the cheekbone and on te lips, using a flat eyeshadow brush.
8. I next added the darker pink shadow on top of these areas where I want more definition e.g. The centre of the lips.
I wasn't completely happy with this makeup look as I felt it didn't have enough colour; however when I added the extra bit of pink on the side of the forehead I think it brought the whole look together and also gave the face more dimension.
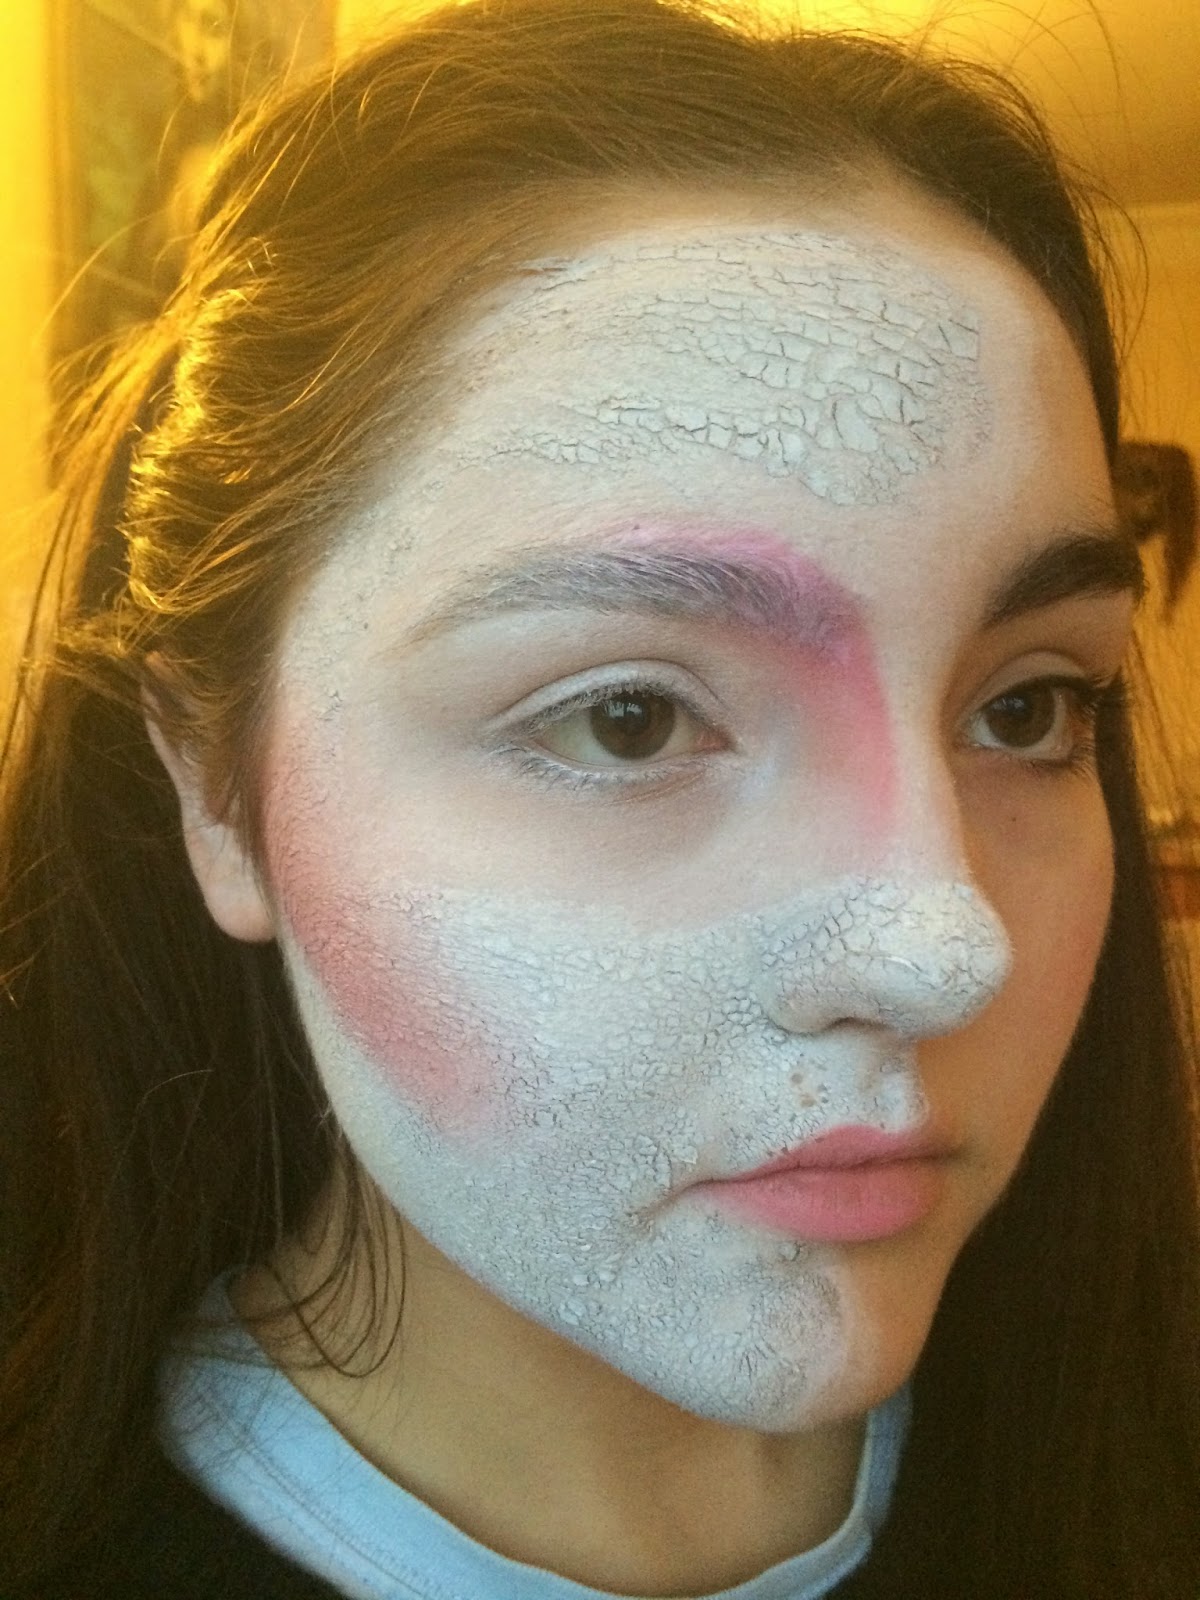
 |
| Final look. |
 |
| Final look. |
In my final look I wanted it to show the contrast between what the Queen Elizabeth I portrayed her makeup to look like through her portraits and also how their makeup would actually look like in person. The rough, flakey, textured looking skin round the face represents the toxic mixture of white lead and vinegar that the Elizabeth women would have used on the face. Then the smooth, even, soft looking skin around the eyes and nose represents what Queen Elizabeth I wanted people to think her skin looked like. I really like the contrast between the two textures and think it adds a unique and contemporary twist to my makeup look. I used a rosy pink colour for the contour as that is the colour that the Elizabethan women subtly wore on their cheeks and lips; however I modified the placement of this colour to give the look a strong, contoured look, which is more popular in today's society.
I think in my final look I will not take the pink colour above the eyebrow and I will just keep it underneath and in the eyebrow hairs. I may also experiment with not making the makeup around the upper nose so sharp as I think it is to much of a contrast against the softer lips and colour on the forehead. I think I may add more red to make the pink colour look more rosy, which would be more like the colour that the Elizabethan women wore on their cheeks and lips. I really like the contrast between the very smooth skin and the bushy, textured eyebrows. In my final look I will try to make the eyebrows even more white so that the colour blends in more with the skin. I am really excited to experiment with these points and apply the makeup look to the whole face.
No comments:
Post a Comment